
We have been hearing the word Tokens quite frequently since Generative AI and Large Language Models (LLMs) became part of our everyday technical discussions.
But have we ever thought about what these tokens actually are, how they are consumed, how much they cost, and how we can monitor and control their consumption?
Let me explain this with an example.
In IT infrastructure, whether we are running workloads on physical servers, VMware, or Cloud platforms like Microsoft Azure and AWS, we always monitor resource utilisation.
For example:
- How much CPU and memory are being consumed?
- How much storage is being utilised?
- How much network traffic is being generated?
- Are we exceeding the allocated infrastructure capacity?
- Are we paying for resources that we don’t actually need?
We have monitoring tools, dashboards, alerts, quotas and budget controls to keep an eye on these resources.
But what about AI workloads?
When we start developing AI-powered applications, chatbots or Agentic AI solutions, we introduce another consumption-based resource called Tokens.
- What exactly are AI Tokens?
In simple terms, tokens are the smaller units of text that an AI model uses to process information and generate responses.
A token can represent:
- A complete word.
- Part of a word.
- A punctuation mark.
- A combination of characters.
For example, when we send a prompt:
“Explain Azure Landing Zone architecture.”
The AI model doesn’t necessarily process this entire sentence as individual words. It breaks it into smaller units called tokens.
There are primarily two types of tokens we need to understand:
Input Tokens:
These are the tokens consumed when we send information to an AI model.
This includes:
- System instructions.
- User prompts.
- Conversation history.
- Context retrieved from documents or databases.
- Tool outputs provided to the model.
Output Tokens:
These are the tokens generated by the AI model while responding to our request.
For example, if I ask an AI assistant to troubleshoot an issue on a Linux server, the prompt, system instructions and collected troubleshooting information contribute towards input tokens, while the generated troubleshooting recommendations contribute towards output tokens.
One important thing to understand is that every interaction is not necessarily limited to the latest question and answer. If we maintain conversation history, previous messages can also be sent again as context, increasing input token consumption.
Practical example: Understanding token consumption
Let’s take a small Python example using the Groq API.
First, install the required packages:
pip install groq
Configure the API key:
export GROQ_API_KEY=”your_groq_api_key”
Now create a Python script:
import os
from groq import Groq
client = Groq(
api_key=os.environ[“GROQ_API_KEY”]
)
response = client.chat.completions.create(
model=”openai/gpt-oss-120b”,
messages=[
{
“role”: “user”,
“content”: “Explain Azure Landing Zone architecture.”
}
],
max_completion_tokens=300
)
print(“AI Response:”)
print(response.choices[0].message.content)
print(“\nToken Consumption:”)
print(“Input Tokens:”,
response.usage.prompt_tokens)
print(“Output Tokens:”,
response.usage.completion_tokens)
print(“Total Tokens:”,
response.usage.total_tokens)
When we execute this script, we get the AI-generated response along with token consumption.
For example, the output could look like this:
AI Response:
Azure Landing Zone provides a scalable
and secure foundation for cloud workloads…
Token Consumption:
Input Tokens: 18
Output Tokens: 120
Total Tokens: 138
Note: The token counts above are illustrative. Actual consumption depends on the model and response.
This is our first step towards understanding how much consumption is happening whenever our application interacts with an LLM.
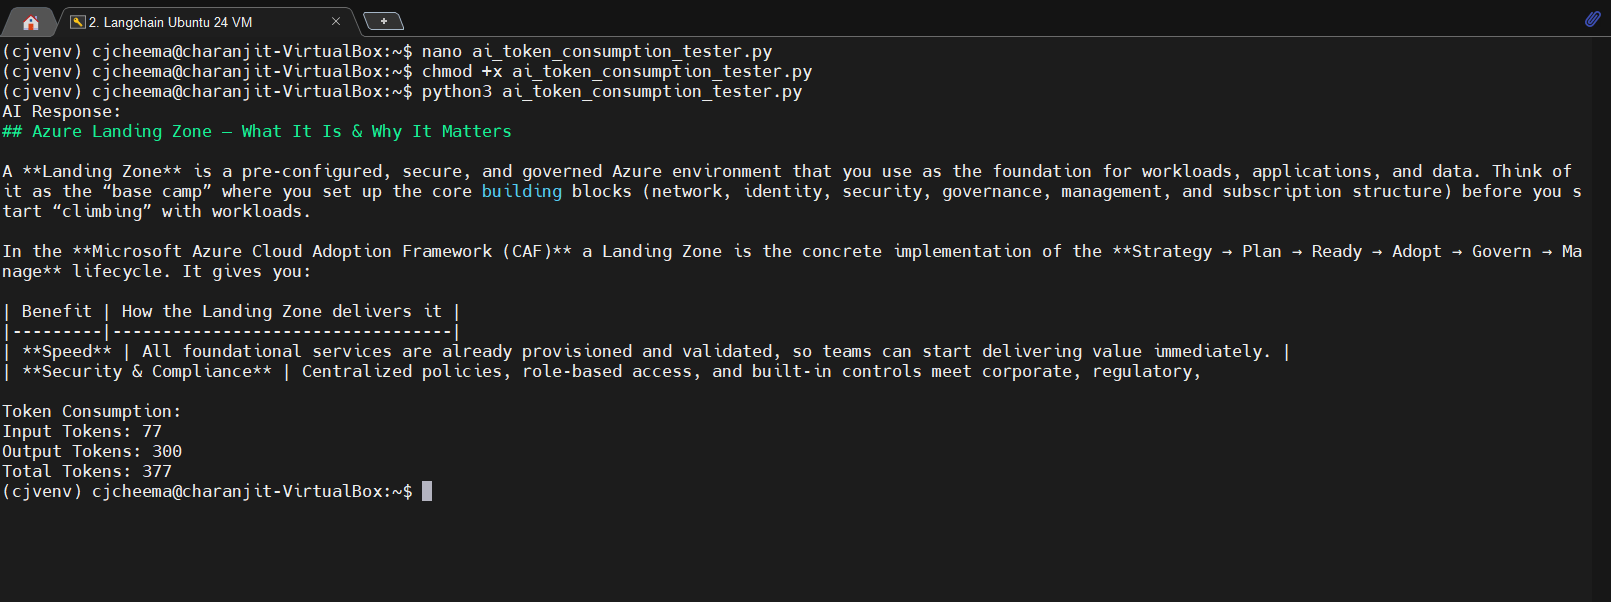
Screenshot: Python execution showing the AI response and input/output token consumption.
- How are AI Tokens consumed and billed?
Now comes the interesting part.
Suppose we are developing an AI-powered Linux troubleshooting assistant or an Agentic AI chatbot using LangChain and LangGraph.
Unlike infrastructure, where we generally calculate costs based on VM size, CPU, memory, storage and running hours, many hosted AI models follow a token-based pricing model.
AI providers generally calculate input and output token consumption separately.
For example, let’s assume an imaginary AI model has the following pricing:
- Input: $1 per million tokens.
- Output: $4 per million tokens.
If our application consumes:
- 100,000 input tokens.
- 50,000 output tokens.
The calculation would be:
Input cost = 100,000 / 1,000,000 × $1 = $0.10
Output cost = 50,000 / 1,000,000 × $4 = $0.20
Total AI consumption cost = $0.30
Now imagine this application is being used by 100 developers, and each developer interacts with the AI assistant several times a day.
The consumption can increase very quickly.
One important thing to remember is that pricing varies between models and providers. Some providers also offer discounted cached input tokens, while others have different pricing for reasoning or multimodal tokens.
This is why you should always refer to the provider’s latest pricing information rather than hardcoding assumptions into your applications.
- How can we monitor AI Token consumption?
Now comes another interesting part.
Suppose I am developing an AI-powered Infrastructure Troubleshooting Assistant.
I want to understand:
- How many tokens are consumed per request?
- How many tokens are consumed by each AI agent?
- Which user or application is consuming more tokens?
- What is the total expenditure?
- Are there any unnecessary LLM calls?
- Is the AI model generating unnecessarily lengthy responses?
For this, we can use LangSmith.
LangSmith provides observability for applications developed using LangChain and LangGraph.
It helps us trace individual executions and understand what is happening inside our AI application.
Practical example: Integrating LangSmith with LangChain
First, install the required packages:
pip install -U langchain
pip install -U langchain-groq
pip install -U langsmith
Configure LangSmith environment variables:
export LANGSMITH_TRACING=true
export LANGSMITH_API_KEY=”your_langsmith_api_key”
export LANGSMITH_PROJECT=”AI-Token-Monitoring”
Now create a Python script:
import os
from langchain_groq import ChatGroq
from langchain_core.messages import HumanMessage
llm = ChatGroq(
model=”openai/gpt-oss-120b”,
temperature=0,
max_tokens=300
)
response = llm.invoke(
[
HumanMessage(
content=”Explain how to troubleshoot ”
“a Linux server running out of memory.”
)
]
)
print(“AI Response:”)
print(response.content)
print(“\nToken Usage:”)
print(response.usage_metadata)
Since we have enabled LangSmith tracing, the execution will automatically be recorded in our LangSmith project.
The response also provides usage metadata containing information such as:
{
“input_tokens”: 25,
“output_tokens”: 150,
“total_tokens”: 175
}
Illustrative values only.
 Screenshot: Langchain script execution output
What can we see in LangSmith?
Once we execute the application, open the LangSmith dashboard and navigate to the tracing project named:
AI-Token-Monitoring
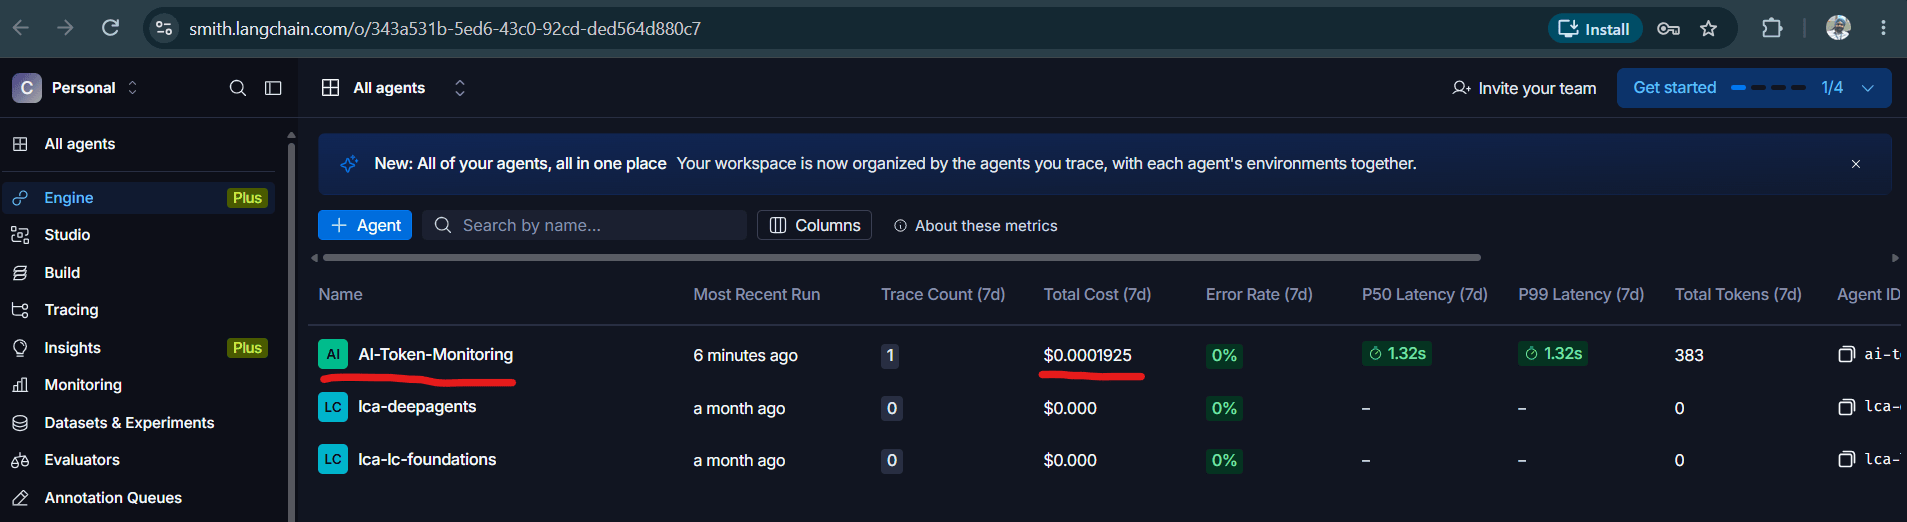
Screenshot: LangSmith AI-Token-Monitoring Project showing the overall workspace view and total AI execution costs.
We can inspect individual executions and identify:
- Input and output token consumption.
- LLM execution time and latency.
- Individual model calls.
- Agent execution and tool calls.
- Errors and failed executions.
- Cost estimation based on model pricing.
Imagine an Agentic AI workflow containing three different agents:
- Linux Troubleshooting Agent.
- Infrastructure Analysis Agent.
- Recommendation Agent.
Instead of looking only at the total token consumption of the complete application, we can inspect individual traces and understand which agent is consuming more tokens.
For example:
| Agent | Input Tokens | Output Tokens |
| Linux Troubleshooting | 1,200 | 500 |
| Infrastructure Analysis | 2,500 | 800 |
| Recommendation | 1,000 | 400 |
| Total | 4,700 | 1,700 |
Illustrative consumption.
This gives us better visibility into where we need to optimise our prompts, workflows and model selection.
Another important point is that LangSmith can automatically calculate costs when it receives the required token usage metadata and has the correct model pricing configuration.
For providers or custom integrations where this information is not automatically available, we need to pass the usage information ourselves.
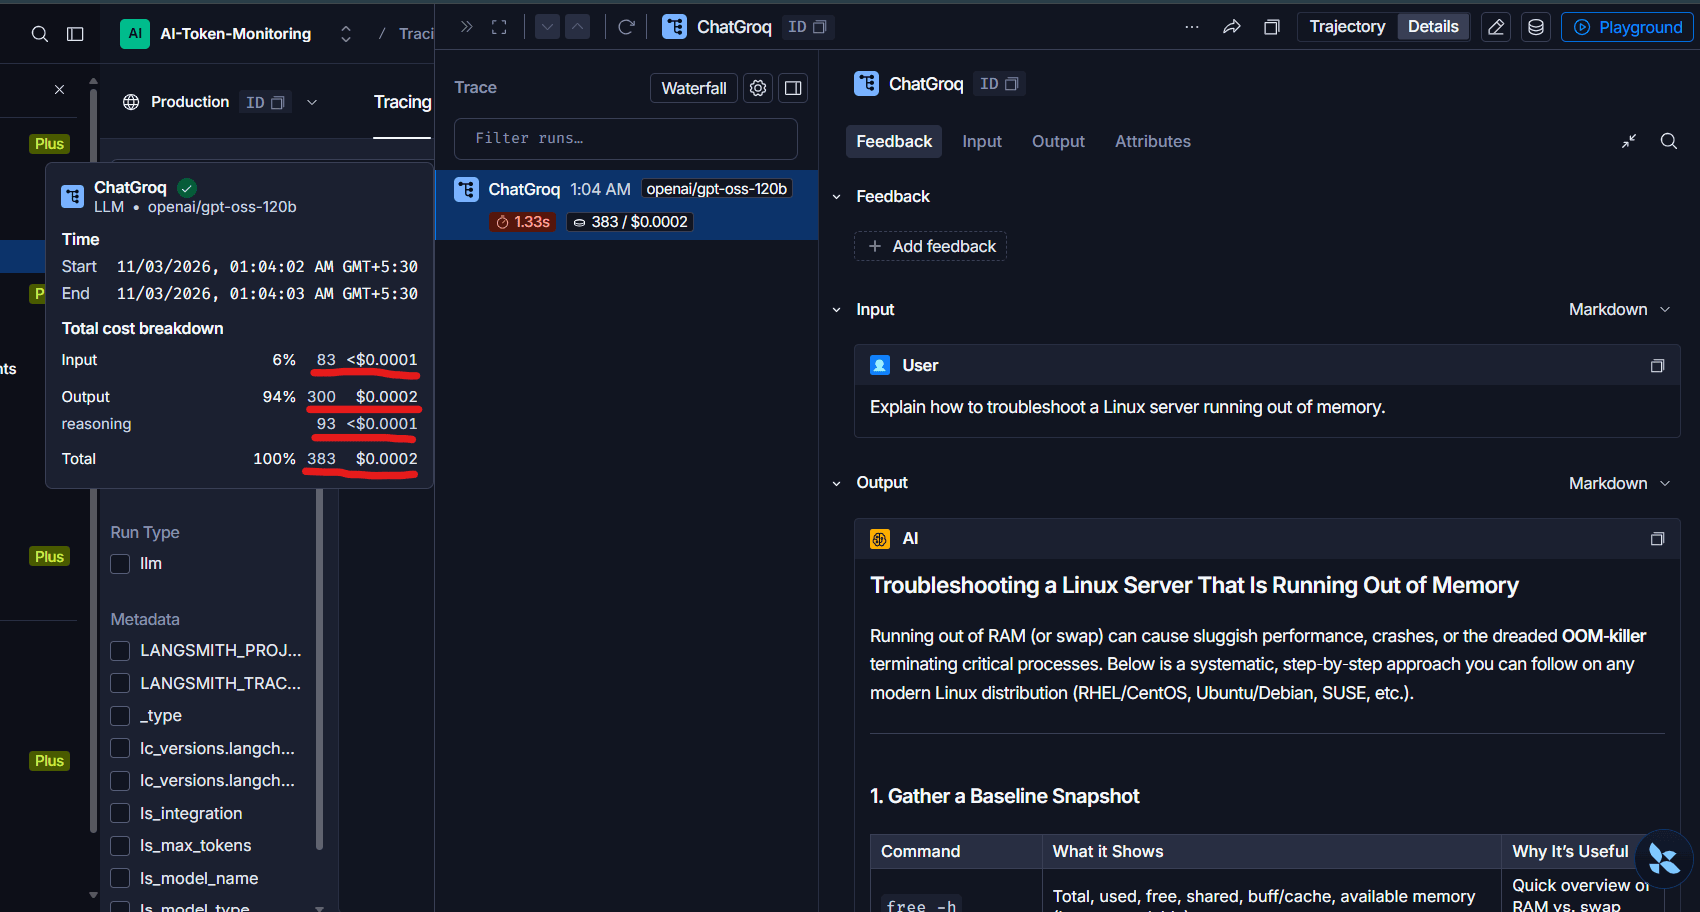
Screenshot: Langsmith view of AI Application execution and Input and Output tokens consumption traces
- How can we control AI Token consumption?
Monitoring is only one part of the solution. We also need mechanisms to control consumption.
Let’s take an example using Groq.
Groq provides an API-based inference platform where we can use different LLMs.
One useful feature is its Project-based resource management.
Instead of sharing one API key across all developers and applications, we can create separate projects.
For example:
| Project | Purpose |
| AI-Development | Developers experimenting with AI models |
| AI-Testing | Testing and validation |
| AI-Production | Production AI applications |
Each project can have its own API keys, usage visibility, access permissions and configurable model-level rate limits.
Practical example: Groq Project Management
We can implement this through the Groq Console.
Step 1: Create separate projects
Navigate to the Projects section in Groq Console.
Create projects such as:
- AI-Development
- AI-Testing
- AI-Production
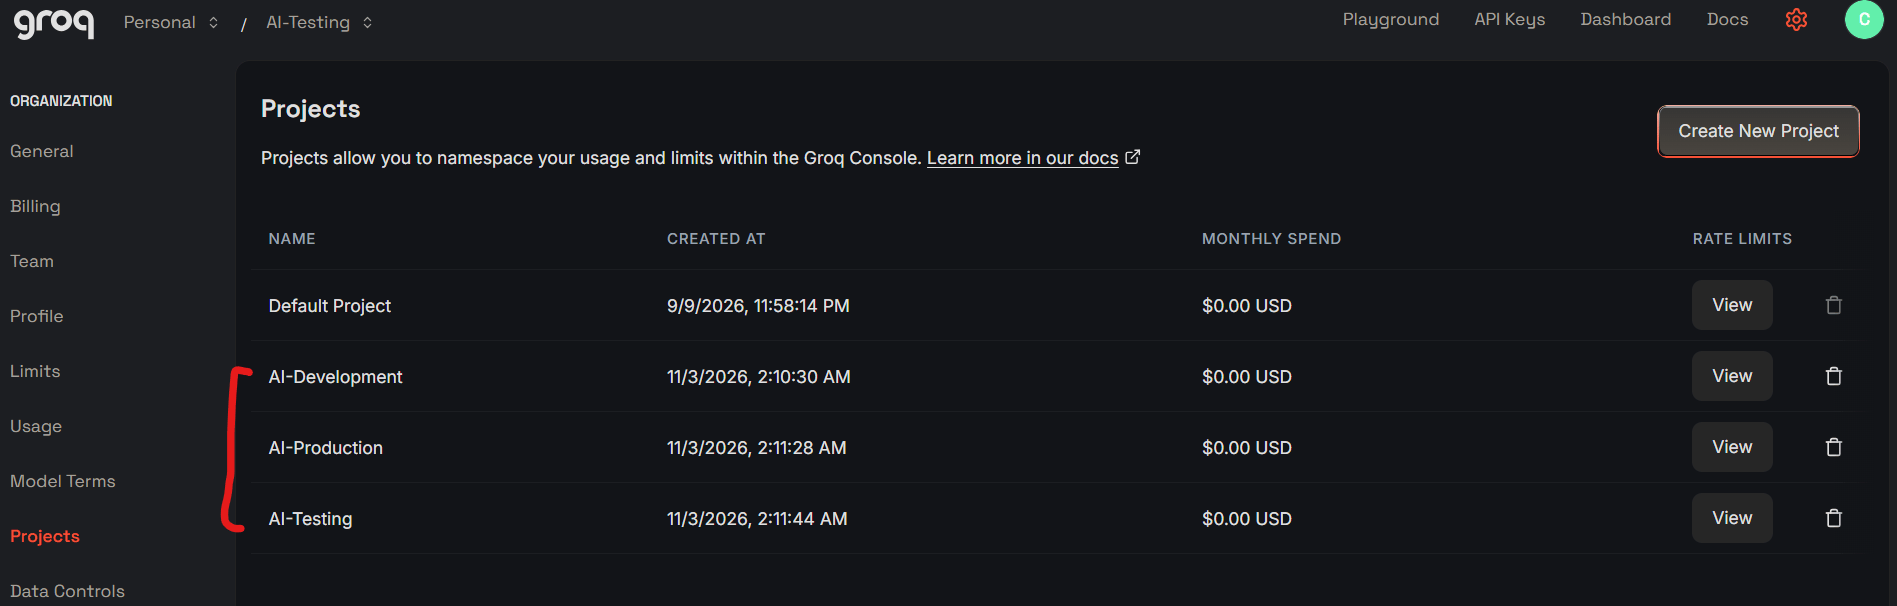
Screenshot: Projects view in Groq console
Step 2: Generate project-specific API keys
Select the relevant project and generate an API key.
For example:
- AI-Development = DEV_API_KEY
- AI-Testing = TEST_API_KEY
- AI-Production = PROD_API_KEY

Screenshot: AI Development API Key
Each application should use the API key associated with its respective project.
Step 3: Configure project-level rate limits
Groq allows us to configure model-level rate limits for individual projects.
For example, we can keep development workloads under restrictive limits while allocating higher limits to production workloads.
These limits can help control:
- Requests per minute.
- Requests per day.
- Tokens per minute.
- Tokens per day.
One important distinction is that project-level rate limits cannot exceed the organisation’s overall limits. Organisation-level input/output token rate limits also remain applicable.
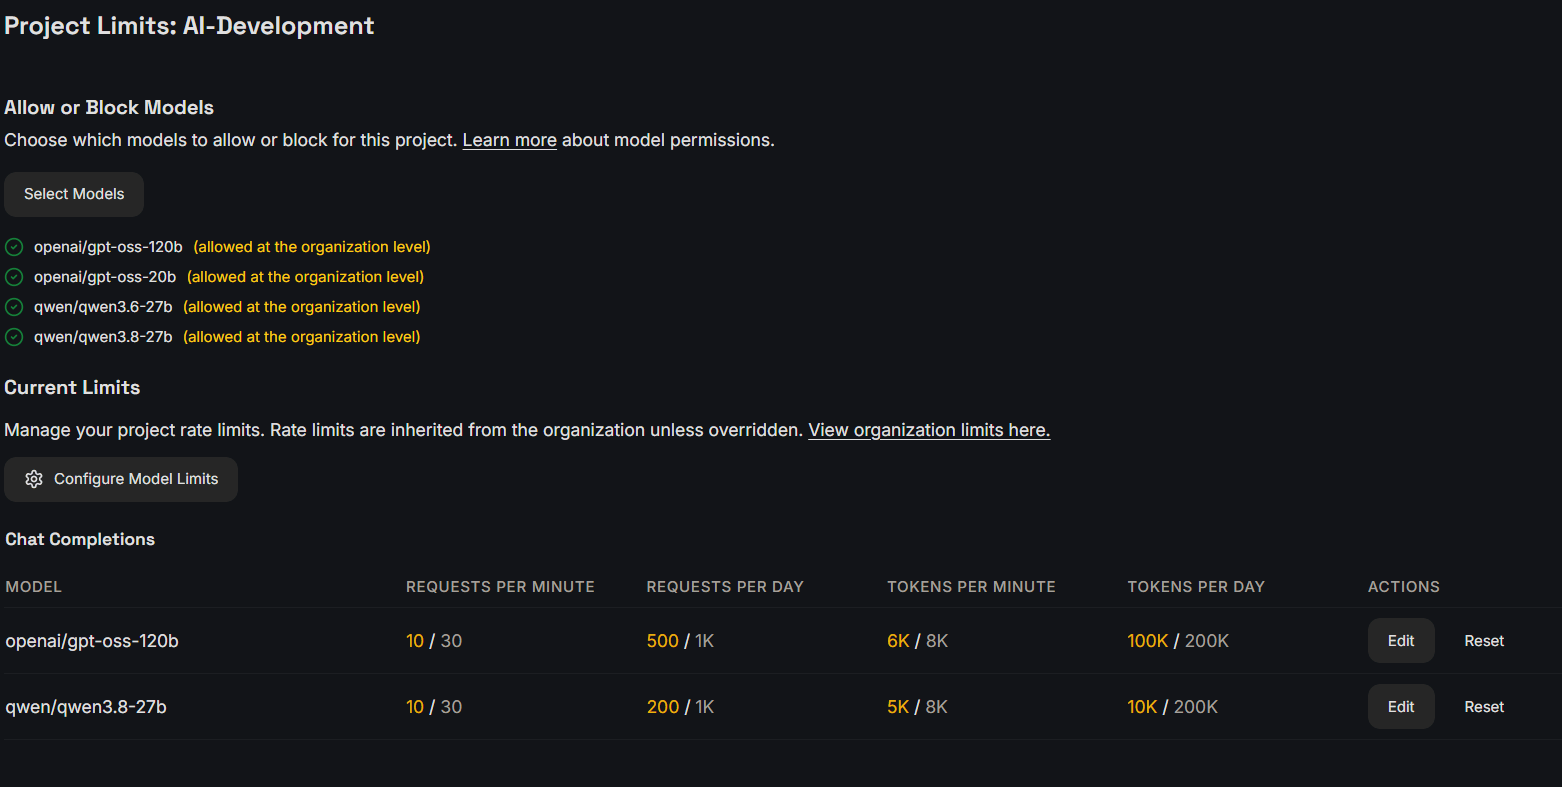
Screenshot: Groq Project level rate limit for Development Project.
What about expenditure control?
Groq also provides organisation-level spending limits and alerts.
We can configure a monthly spending limit and define alert thresholds such as:
- 50% consumption.
- 75% consumption.
- 90% consumption.
Once the organisation reaches its configured spending limit, new API requests are blocked.
However, there is an important distinction here:
Groq currently supports project-specific API keys, usage visibility and rate limits, but its monthly spending limit applies at the organisation level, not individually to each API key or project.
Therefore, if we want individual team-level expenditure allocation, we should additionally implement application-level usage tracking.
This is where LangSmith and our application-level controls become useful.

Screenshot: Groq Organisation level limit page
- How can LangChain, LangGraph and LangSmith work together?
Let’s understand this through a practical architecture.
Suppose we are developing an AI-powered self-service chatbot for infrastructure troubleshooting.
The architecture could look something like this:
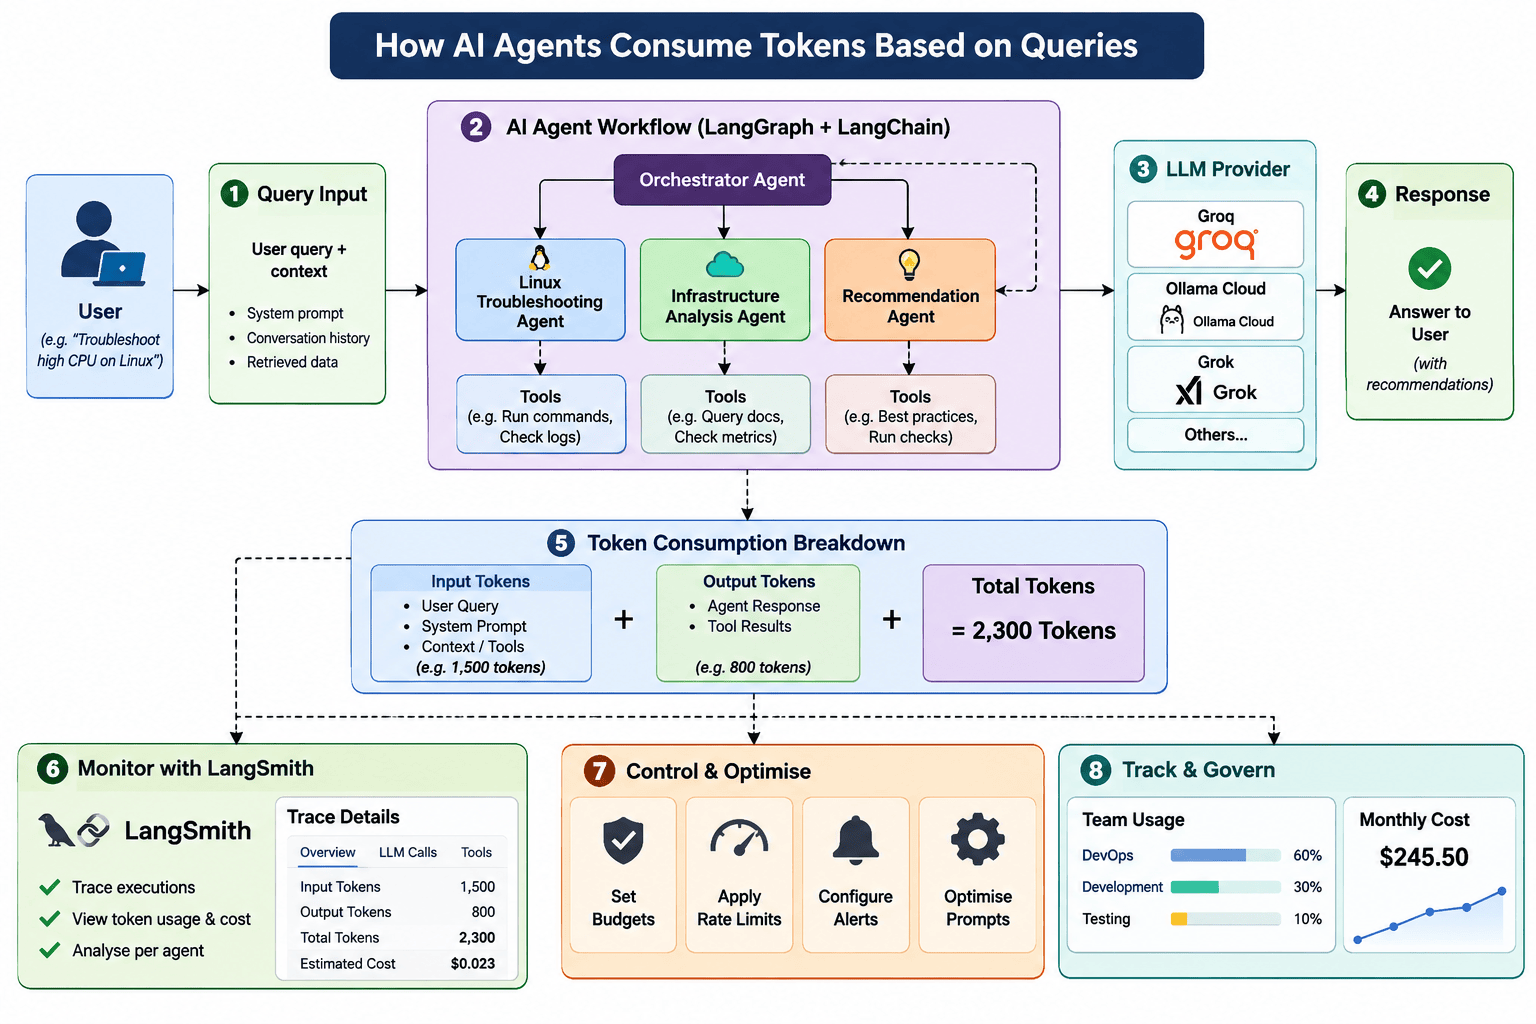
Screenshot: Architecture Diagram illustrating the LangChain, LangGraph and LangSmith workflow, including AI model integration and token consumption tracking.
Here is what each component does:
LangChain:
Provides the integration layer to connect our application with different LLM providers, manage prompts, invoke models and integrate tools.
For example, we can use ChatGroq to connect with Groq models.
Alternatively, we can use ChatOpenAI with Ollama Cloud’s OpenAI-compatible API.
LangGraph:
Helps us design workflows involving multiple agents, conditional execution, state management and tool calling.
For example, depending on the user’s request, LangGraph can decide whether to invoke a Linux troubleshooting agent, infrastructure analysis agent or another specialised agent.
LangSmith:
Provides tracing and observability across these executions, allowing us to understand token consumption, execution time, errors and estimated costs.
Practical example: Building a simple LangGraph workflow
Let’s create a basic LangGraph application that invokes an LLM.
Install the packages:
pip install -U langgraph langchain-groq langsmith
Create a Python script:
from typing import TypedDict
from langchain_groq import ChatGroq
from langgraph.graph import (
StateGraph,
START,
END
)
class AgentState(TypedDict):
question: str
answer: str
llm = ChatGroq(
model=”openai/gpt-oss-120b”,
temperature=0,
max_tokens=300
)
def troubleshooting_agent(state: AgentState):
response = llm.invoke(
state[“question”]
)
print(“\nToken Consumption:”)
print(response.usage_metadata)
return {
“answer”: response.content
}
builder = StateGraph(AgentState)
builder.add_node(
“troubleshooting_agent”,
troubleshooting_agent
)
builder.add_edge(
START,
“troubleshooting_agent”
)
builder.add_edge(
“troubleshooting_agent”,
END
)
graph = builder.compile()
result = graph.invoke(
{
“question”:
“How can I troubleshoot a Linux server ”
“experiencing high CPU utilisation?”
}
)
print(“\nFinal AI Response:”)
print(result[“answer”])
Here, we have created a simple workflow using LangGraph.
The workflow invokes our LLM through LangChain and returns the generated response.
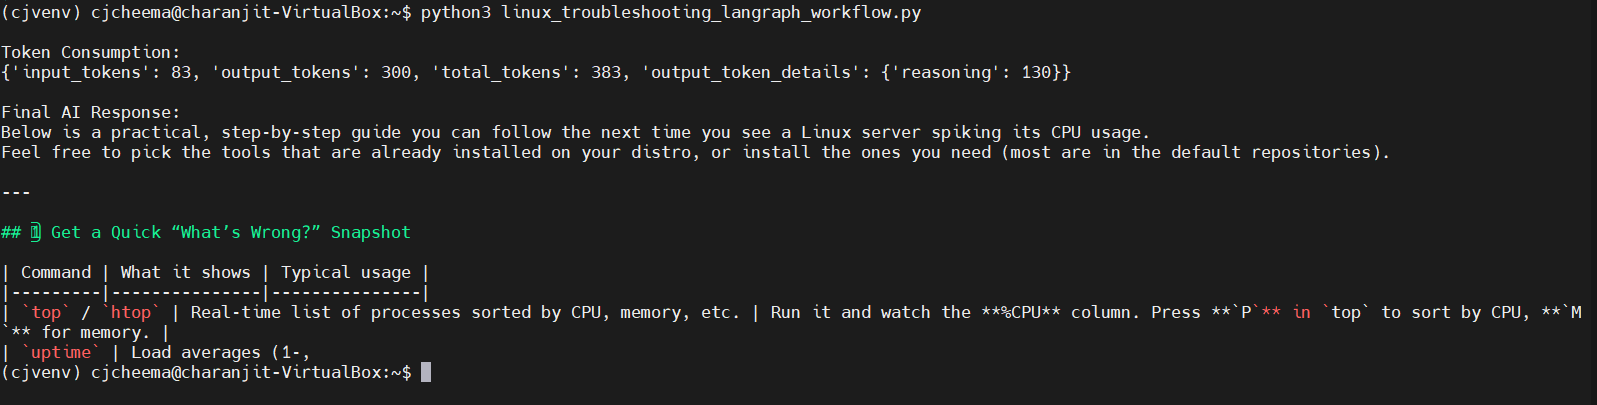
Screenshot: Linux troubleshooting LangGraph workflow execution
Since LangSmith tracing is enabled through environment variables, we can also inspect the execution in the LangSmith dashboard.
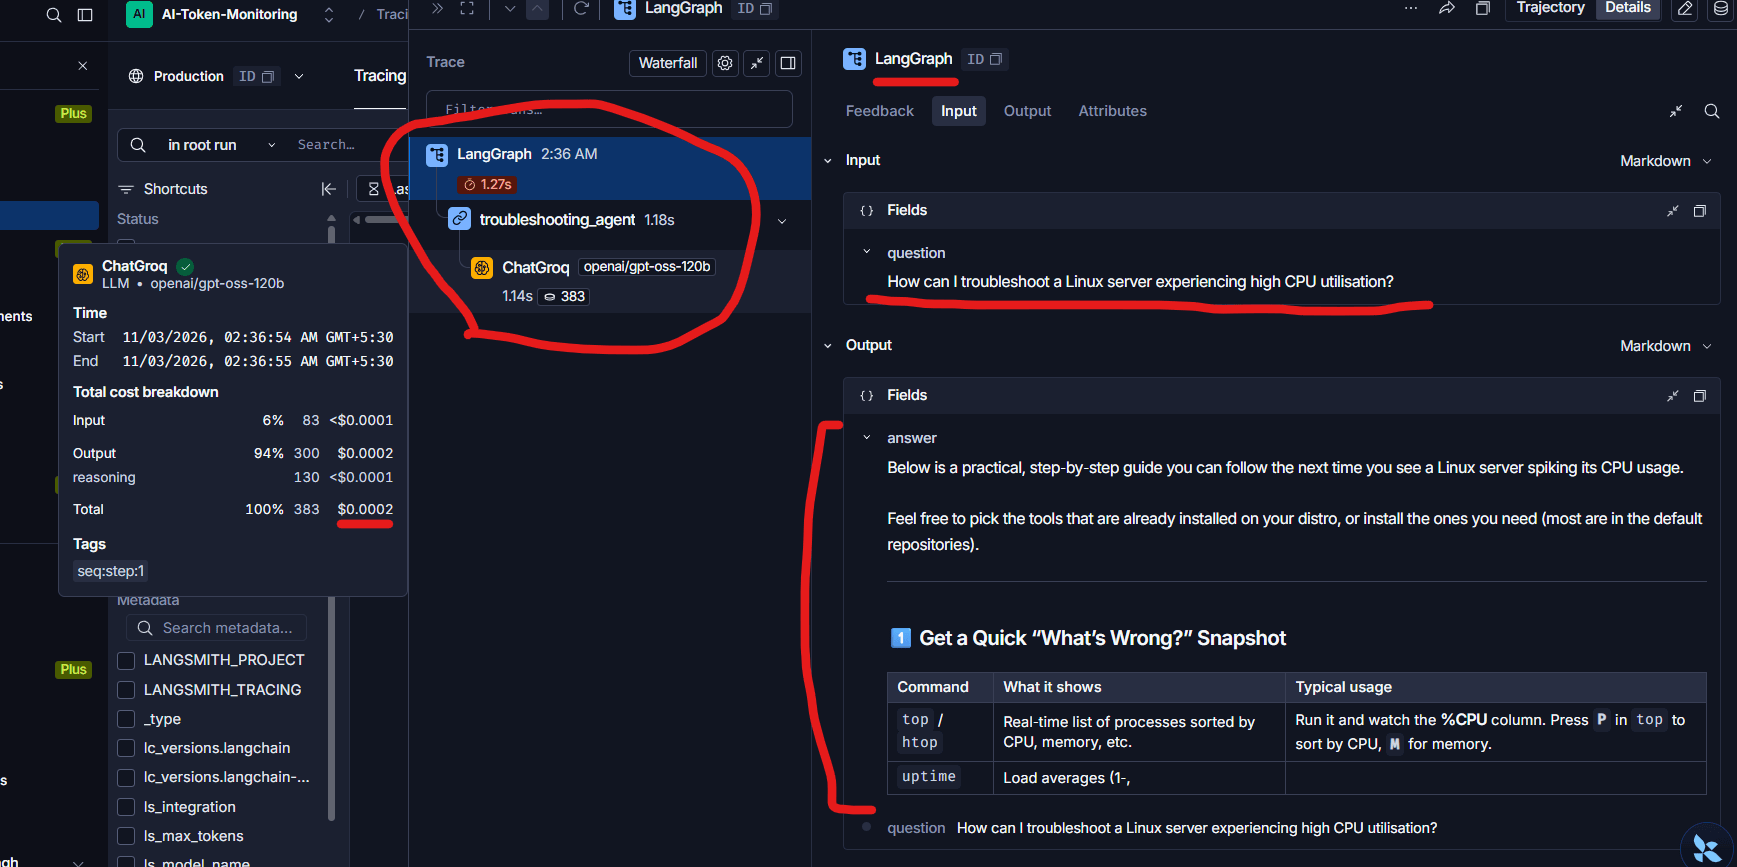
Screenshot: Langsmith shows LangGraph execution traces
Now imagine extending this workflow with multiple agents and conditional execution.
We can monitor the individual LLM calls and understand how much token consumption is happening at each stage.
This is where LangGraph and LangSmith become particularly useful for Agentic AI applications.
- What about Ollama Cloud and Grok?
This solution is not restricted to using Groq.
We can use different AI providers depending on our requirements.
Ollama Cloud
Ollama Cloud provides hosted open models such as GPT-OSS, Gemma and DeepSeek.
Its API can be accessed directly without requiring us to run the model locally.
For example, we can use an API key and access the hosted models through Ollama’s cloud endpoint.
Let’s see how we can integrate Ollama Cloud with LangChain.
First, configure the API key:
export OLLAMA_API_KEY=”your_ollama_api_key”
Install the required package:
pip install -U langchain-openai
Ollama Cloud provides an OpenAI-compatible API endpoint.
Therefore, we can use LangChain’s ChatOpenAI integration to communicate with it.
import os
from langchain_openai import ChatOpenAI
llm = ChatOpenAI(
model=”gemma4:31b”,
base_url=”https://ollama.com/v1″,
api_key=os.environ[“OLLAMA_API_KEY”],
temperature=0,
max_tokens=300
)
response = llm.invoke(
“Explain how to troubleshoot ”
“a Linux server experiencing high CPU utilisation.”
)
print(“AI Response:”)
print(response.content)
print(“\nToken Usage:”)
print(response.usage_metadata)

Screenshot: Ollama Model response
Here, we are not using OpenAI as our model provider.
We are simply using the OpenAI-compatible API interface provided by Ollama Cloud through LangChain.
This is an interesting approach because we can retain much of our existing LangChain application code while changing the model provider.
We can also enable LangSmith tracing using the same environment variables discussed earlier.

Screenshot: Ollama model response and its Token usage Langsmith trace
One important consideration is that we should verify whether the selected Ollama model and API endpoint return token usage metadata in the format expected by LangChain. If the provider does not expose usage information, we need to capture and pass that information separately.
Grok (xAI)
Like previous other AI model providers, Grok provides similar API access to its models through token-based billing.
We can integrate it into our application using LangChain’s ChatOpenAI integration with the xAI API’s compatible endpoint.
For example:
import os
from langchain_openai import ChatOpenAI
llm = ChatOpenAI(
model=”grok-3″,
base_url=”https://api.x.ai/v1″,
api_key=os.environ[“XAI_API_KEY”],
temperature=0,
max_tokens=300
)
response = llm.invoke(
“Explain the importance of ”
“Azure Landing Zone governance.”
)
print(response.content)
print(response.usage_metadata)
Note: The model name is an example; select a currently available model from the xAI API catalogue.
Both providers can be integrated into an application architecture using suitable LangChain integrations or compatible model interfaces.
The important point is that we should not tightly couple our application with one particular LLM provider.
Keeping the model integration layer configurable makes it easier to switch between providers depending on cost, performance, availability and business requirements.
- How can we implement application-level Token Budgets?
So far, we have discussed monitoring token consumption through LangSmith and controlling usage through provider-level configurations.
But what if I want to assign a specific token budget to each team?
For example:
| Team | Monthly Token Budget |
| Cloud Architecture | 5 Million |
| DevOps | 3 Million |
| Development | 2 Million |
| Testing | 1 Million |
This is where we can introduce application-level token governance.
For a production implementation, we should maintain consumption in a persistent database or centralised usage service rather than an in-memory Python dictionary.
We should also reserve an estimated token budget before invoking the model and reconcile it with actual consumption after the response.
For concurrent applications, we need atomic budget checks to avoid multiple requests exceeding the same team’s allocation.
We can extend this approach by integrating:
- Redis or a database for centralised token tracking.
- LangSmith for execution-level observability.
- Groq project-specific API keys.
- Application-level team identification.
- Alerts when consumption reaches predefined thresholds.
This gives us a better governance model where we can understand not only the overall AI expenditure but also which team or application is responsible for it.
Another option worth exploring is LiteLLM, which provides additional capabilities for tracking spending by API key, user and team, along with budgets and rate limits.
- My recommended approach for AI Cost Optimisation
From an infrastructure and DevOps perspective, I would follow a similar approach to how we manage cloud resource consumption.
Some of the practices I would recommend are:
- Use separate API keys:
Avoid sharing the same API key across multiple applications and environments.
- Implement project-level isolation:
Separate development, testing and production workloads.
- Monitor token consumption:
Use LangSmith traces and provider dashboards to identify consumption patterns.
- Set response limits:
Configure maximum output tokens so that the model does not generate unnecessarily lengthy responses.
- Optimise prompts:
Avoid sending unnecessary system instructions, conversation history and repeated context.
- Implement conversation management:
Retain only relevant conversation history instead of continuously passing the entire conversation to the model.
- Choose the right model:
Do not use an expensive, high-capability model for every simple task. Use smaller models where they are sufficient.
- Use caching:
Reuse suitable responses and take advantage of provider-supported prompt caching where applicable.
- Implement application-level quotas:
Track consumption by application, team or user and enforce usage budgets within the application.
- Configure alerts:
Notify the responsible team when consumption approaches predefined thresholds.
- Monitor Agentic AI workflows:
Keep an eye on how many times an agent invokes an LLM or executes tools. Unnecessary agent loops can increase token consumption significantly.
- Review AI expenditure regularly:
Just like cloud expenditure, review token consumption periodically and identify opportunities for optimisation.
Wrap Up!
I believe AI Cost Optimisation should become an important part of our AI application architecture, just as FinOps has become an important consideration in Cloud Architecture.
When we design an AI-powered application, our responsibility should not end with making the chatbot or AI agent work successfully.
We should also understand how efficiently it consumes tokens, how much each execution costs, and whether we have sufficient controls to prevent unnecessary expenditure.
Just like we don’t deploy infrastructure workloads without considering monitoring, security, capacity and cost, we should follow the same discipline when designing AI-powered applications.
Building an AI application is one thing, but building an AI application that is observable, cost-efficient and properly governed is what makes it production-ready.

Charanjit is passionate about automating tasks and improving processes. He uses tools like Terraform and Azure DevOps to build and manage cloud infrastructure and streamline deployment. He also enjoys using Shell scripts and Ansible playbooks to make systems run more efficiently.
In his free time, Charanjit enjoys learning about new technologies and sharing his knowledge through his blog. When he’s not working, he likes listening to music, having a cup of coffee, and relaxing in nature.
You can connect with Charanjit on Twitter, Facebook, LinkedIn, or email him at charanjit.cheema@cjcheema.com.
- AI Tokens: Understanding, Monitoring and Controlling Token Usage and LLM Costs - November 2, 2026
- Building a Linux and DevOps AI Assistant Using Bash and Ollama - September 20, 2026
- How to optimize the performance of Ansible Automation Platform or Ansible Tower - July 16, 2023